
Welcome, DevOps engineers! Are you tired of manually configuring and managing your infrastructure on AWS? Do you wish there was a way to simplify and automate the process? Look no further! In this blog post, we will explore the powerful combination of AWS and Terraform, and how it can revolutionize your infrastructure management.
What is AWS Terraform?
Before diving into the details, let’s start with the basics. AWS Terraform is an open-source infrastructure as code (IaC) tool developed by HashiCorp. It enables you to define your infrastructure in a declarative language and then provision and manage it on AWS.
By using AWS Terraform, you can treat your infrastructure as code, bringing the benefits of software engineering practices to your infrastructure management. With Terraform, you can define and version your infrastructure configurations, automate provisioning and deployment, and ensure consistency across environments.
Getting Started with AWS Terraform
If you’re new to AWS Terraform, getting started may seem overwhelming at first. But fear not! We’re here to guide you through the process.
Install Terraform
The first step is to install Terraform on your local machine. Head over to the official HashiCorp website and download the latest version of Terraform for your operating system. Once downloaded, follow the installation instructions to complete the setup.
Set Up AWS Credentials
To interact with AWS using Terraform, you’ll need to set up your AWS credentials. This involves creating an IAM user with the necessary permissions and configuring the AWS CLI on your machine. By doing so, Terraform can authenticate and make API calls on your behalf.
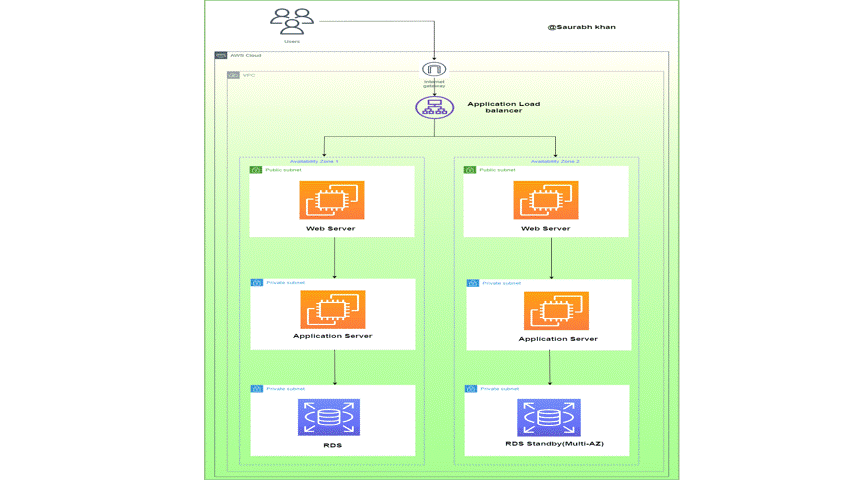
How to deploy a three-tier architecture in AWS using Terraform?
In this tutorial, I will deploy a three-tier application in AWS using Terraform.
Prerequisites:
- Basic knowledge of AWS & Terraform
- AWS account
- AWS Access & Secret Key
Step 1:- Create a file for the VPC
- Create vpc.tf file and add the below code to it
# Creating VPC
resource "aws_vpc" "demovpc" {
  cidr_block       = "${var.vpc_cidr}"
  instance_tenancy = "default"
tags = {
  Name = "Demo VPC"
}
}
Step 2:- Create a file for the Subnet
- For this project, I will create total 6 subnets for the front-end tier and back-end tier with a mixture of public & private subnet
- Create subnet.tf file and add the below code to it
# Creating 1st web subnet
resource "aws_subnet" "public-subnet-1" {
  vpc_id                  = "${aws_vpc.demovpc.id}"
  cidr_block             = "${var.subnet_cidr}"
  map_public_ip_on_launch = true
  availability_zone = "us-east-1a"
tags = {
  Name = "Web Subnet 1"
}
}
# Creating 2nd web subnet
resource "aws_subnet" "public-subnet-2" {
  vpc_id                  = "${aws_vpc.demovpc.id}"
  cidr_block             = "${var.subnet1_cidr}"
  map_public_ip_on_launch = true
  availability_zone = "us-east-1b"
tags = {
  Name = "Web Subnet 2"
}
}
# Creating 1st application subnet
resource "aws_subnet" "application-subnet-1" {
  vpc_id                  = "${aws_vpc.demovpc.id}"
  cidr_block             = "${var.subnet2_cidr}"
  map_public_ip_on_launch = false
  availability_zone = "us-east-1a"
tags = {
  Name = "Application Subnet 1"
}
}
# Creating 2nd application subnet
resource "aws_subnet" "application-subnet-2" {
  vpc_id                  = "${aws_vpc.demovpc.id}"
  cidr_block             = "${var.subnet3_cidr}"
  map_public_ip_on_launch = false
  availability_zone = "us-east-1b"
tags = {
  Name = "Application Subnet 2"
}
}
# Create Database Private Subnet
resource "aws_subnet" "database-subnet-1" {
  vpc_id            = "${aws_vpc.demovpc.id}"
  cidr_block        = "${var.subnet4_cidr}"
  availability_zone = "us-east-1a"
tags = {
  Name = "Database Subnet 1"
}
}
# Create Database Private Subnet
resource "aws_subnet" "database-subnet-2" {
  vpc_id            = "${aws_vpc.demovpc.id}"
  cidr_block        = "${var.subnet5_cidr}"
  availability_zone = "us-east-1a"
tags = {
  Name = "Database Subnet 1"
}
}
Step 3:- Create a file for the Internet Gateway
- Create igw.tf file and add the below code to it
# Creating Internet Gateway
resource "aws_internet_gateway" "demogateway" {
  vpc_id = "${aws_vpc.demovpc.id}"
}
Step 4:- Create a file for the Route table
- Create route_table_public.tf file and add the below code to it
# Creating Route Table
resource "aws_route_table" "route" {
  vpc_id = "${aws_vpc.demovpc.id}"
route {
      cidr_block = "0.0.0.0/0"
      gateway_id = "${aws_internet_gateway.demogateway.id}"
  }
tags = {
      Name = "Route to internet"
  }
}
# Associating Route Table
resource "aws_route_table_association" "rt1" {
  subnet_id = "${aws_subnet.demosubnet.id}"
  route_table_id = "${aws_route_table.route.id}"
}
# Associating Route Table
resource "aws_route_table_association" "rt2" {
  subnet_id = "${aws_subnet.demosubnet1.id}"
  route_table_id = "${aws_route_table.route.id}"
}- In the above code, I am creating a new route table and forwarding all the requests to the 0.0.0.0/0 CIDR block.
- I am also attaching this route table to the subnet created earlier. So, it will work as the Public Subnet
Step 5:- Create a file for EC2 instances
- Create ec2.tf file and add the below code to it
# Creating 1st EC2 instance in Public Subnet
resource "aws_instance" "demoinstance" {
  ami                         = "ami-087c17d1fe0178315"
  instance_type               = "t2.micro"
  count                       = 1
  key_name                    = "tests"
  vpc_security_group_ids      = ["${aws_security_group.demosg.id}"]
  subnet_id                   = "${aws_subnet.demoinstance.id}"
  associate_public_ip_address = true
  user_data                   = "${file("data.sh")}"
tags = {
  Name = "My Public Instance"
}
}
# Creating 2nd EC2 instance in Public Subnet
resource "aws_instance" "demoinstance1" {
  ami                         = "ami-087c17d1fe0178315"
  instance_type               = "t2.micro"
  count                       = 1
  key_name                    = "tests"
  vpc_security_group_ids      = ["${aws_security_group.demosg.id}"]
  subnet_id                   = "${aws_subnet.demoinstance.id}"
  associate_public_ip_address = true
  user_data                   = "${file("data.sh")}"
tags = {
  Name = "My Public Instance 2"
}
}
I have used the userdata to configure the EC2 instance, I will discuss data.sh file later in the article.
Step 6:- Create a file for Security Group for the FrontEnd tier
- Create web_sg.tf file and add the below code to it
# Creating Security Group
resource "aws_security_group" "demosg" {
  vpc_id = "${aws_vpc.demovpc.id}"
# Inbound Rules
# HTTP access from anywhere
ingress {
  from_port   = 80
  to_port     = 80
  protocol    = "tcp"
  cidr_blocks = ["0.0.0.0/0"]
}
# HTTPS access from anywhere
ingress {
  from_port   = 443
  to_port     = 443
  protocol    = "tcp"
  cidr_blocks = ["0.0.0.0/0"]
}
# SSH access from anywhere
ingress {
  from_port   = 22
  to_port     = 22
  protocol    = "tcp"
  cidr_blocks = ["0.0.0.0/0"]
}
# Outbound Rules
# Internet access to anywhere
egress {
  from_port   = 0
  to_port     = 0
  protocol    = "-1"
  cidr_blocks = ["0.0.0.0/0"]
}
tags = {
  Name = "Web SG"
}
}
I have opened 80,443 & 22 ports for the inbound connection, and I have opened all the ports for the outbound connection.
Step 7:- Create a file for Security Group for the Database tier
- Create database_sg.tf file and add the below code to it
# Create Database Security Group
resource "aws_security_group" "database-sg" {
  name        = "Database SG"
  description = "Allow inbound traffic from application layer"
  vpc_id      = aws_vpc.demovpc.id
ingress {
  description     = "Allow traffic from application layer"
  from_port       = 3306
  to_port         = 3306
  protocol        = "tcp"
  security_groups = [aws_security_group.demosg.id]
}
egress {
  from_port   = 32768
  to_port     = 65535
  protocol    = "tcp"
  cidr_blocks = ["0.0.0.0/0"]
}
tags = {
  Name = "Database SG"
}
}
I have opened 3306 ports for the inbound connection, and I have opened all the ports for the outbound connection.
Step 8:- Create a file Application Load Balancer
- Create alb.tf file and add the below code to it
# Creating External LoadBalancer
resource "aws_lb" "external-alb" {
  name               = "External LB"
  internal           = false
  load_balancer_type = "application"
  security_groups    = [aws_security_group.demosg.id]
  subnets            = [aws_subnet.public-subnet-1.id, aws_subnet.public-subnet-1.id]
}
resource "aws_lb_target_group" "target-elb" {
  name     = "ALB TG"
  port     = 80
  protocol = "HTTP"
  vpc_id   = aws_vpc.demovpc.id
}
resource "aws_lb_target_group_attachment" "attachment" {
  target_group_arn = aws_lb_target_group.external-alb.arn
  target_id        = aws_instance.demoinstance.id
  port             = 80
depends_on = [
  aws_instance.demoinstance,
]
}
resource "aws_lb_target_group_attachment" "attachment" {
  target_group_arn = aws_lb_target_group.external-alb.arn
  target_id        = aws_instance.demoinstance1.id
  port             = 80
depends_on = [
  aws_instance.demoinstance1,
]
}
resource "aws_lb_listener" "external-elb" {
  load_balancer_arn = aws_lb.external-alb.arn
  port              = "80"
  protocol          = "HTTP"
default_action {
  type             = "forward"
  target_group_arn = aws_lb_target_group.external-alb.arn
}
}- The above load balancer is of type external
- Load balancer type is set to application
- The aws_lb_target_group_attachment resource will attach our instances to the Target Group.
- The load balancer will listen requests on port 80
Step 9:- Create a file for the RDS instance
- Create a rds.tf file and add the below code to it
# Creating RDS Instance
resource "aws_db_subnet_group" "default" {
  name       = "main"
  subnet_ids = [aws_subnet.database-subnet-1.id, aws_subnet.database-subnet-1.id]
tags = {
  Name = "My DB subnet group"
}
}
resource "aws_db_instance" "default" {
  allocated_storage      = 10
  db_subnet_group_name   = aws_db_subnet_group.default.id
  engine                 = "mysql"
  engine_version         = "8.0.20"
  instance_class         = "db.t2.micro"
  multi_az               = true
  name                   = "mydb"
  username               = "username"
  password               = "password"
  skip_final_snapshot    = true
  vpc_security_group_ids = [aws_security_group.database-sg.id]
}- In the above code, you need to change the value of username & password
- multi-az is set to true for the high availability
Step 10:- Create a file for outputs
- Create outputs.tf file and add the below code to it.
# Getting the DNS of load balancer
output "lb_dns_name" {
  description = "The DNS name of the load balancer"
  value       = "${aws_lb.external-alb.dns_name}"
}
From the above code, I will get the DNS of the application load balancer.
Step 11:- Create a file for variable
- Create vars.tf file and add the below code to it
# Defining CIDR Block for VPC
variable "vpc_cidr" {
  default = "10.0.0.0/16"
}
# Defining CIDR Block for 1st Subnet
variable "subnet_cidr" {
  default = "10.0.1.0/24"
}
# Defining CIDR Block for 2nd Subnet
variable "subnet1_cidr" {
  default = "10.0.2.0/24"
}
# Defining CIDR Block for 3rd Subnet
variable "subnet2_cidr" {
  default = "10.0.3.0/24"
}
# Defining CIDR Block for 3rd Subnet
variable "subnet2_cidr" {
  default = "10.0.4.0/24"
}
# Defining CIDR Block for 3rd Subnet
variable "subnet2_cidr" {
  default = "10.0.5.0/24"
}
# Defining CIDR Block for 3rd Subnet
variable "subnet2_cidr" {
  default = "10.0.6.0/24"
}
Step 12:- Create a file for user data
- Create data.sh file and add the below code to it
#!/bin/bash
yum update -y
yum install -y httpd.x86_64
systemctl start httpd.service
systemctl enable httpd.service
echo "Hello World from $(hostname -f)" > /var/www/html/index.html- The above code will install an apache webserver in the EC2 instances
So, now our entire code is ready. We need to run the below steps to create infrastructure.
- terraform init is to initialize the working directory and downloading plugins of the provider
- terraform plan is to create the execution plan for our code.
- terraform apply is to create the actual infrastructure. It will ask you to provide the Access Key and Secret Key in order to create the infrastructure. So, instead of hardcoding the Access Key and Secret Key, it is better to apply at the run time.
Step 13:- Verify the resources
- Terraform will create below resources
- VPC
- Application Load Balancer
- Public & Private Subnets
- EC2 instances
- RDS instance
- Route Table
- Internet Gateway
- Security Groups for Web & RDS instances
- Route Table
Once the resource creation finishes you can get the DNS of a load balancer and paste it into the browser and you can see load balancer will send the request to two instances.
That’s it now, you have learned how to create various resources in AWS using Terraform.
Congratulations! You’ve successfully provisioned your infrastructure using AWS Terraform. But the journey doesn’t end here. As your requirements evolve, you’ll need to make changes to your infrastructure.
Terraform makes it easy to manage changes to your infrastructure. Simply update your configuration file with the desired changes, and then run the terraform plan and terraform apply commands again. Terraform will intelligently determine what needs to be added, modified, or removed based on the changes you’ve made.
Collaboration and Versioning
One of the major advantages of using AWS Terraform is its support for collaborative workflows and version control. You can store your Terraform configuration files in a version control system like Git, making it easy to collaborate with your team and track changes over time.
Additionally, Terraform allows you to create reusable modules, which encapsulate a set of resources and their configurations. These modules can be shared between projects and teams, promoting code reuse and streamlining infrastructure management.
Conclusion: Building Better Infrastructure with AWS Terraform
In conclusion, AWS Terraform is a powerful tool that enables DevOps engineers to simplify and automate their infrastructure management on AWS. By treating infrastructure as code and leveraging the declarative power of Terraform, you can achieve consistency, scalability, and repeatability across your environments.
We’ve only scratched the surface of what AWS Terraform can do. Dive deeper into the official Terraform documentation to explore advanced features, such as remote state management, provisioning with variables, and integration with other AWS services.
So go ahead, give AWS Terraform a try, and unlock the full potential of your infrastructure management. Embrace the power of automation and say goodbye to manual configurations and tedious operations. Happy terraforming!