
Introduction
Git branches represent separate lines of development within a Git project. Depending on whether the repository is local or remote, there are various methods to enumerate all branches.
Listing your branches aids in managing distinct versions of your codebase. This practice prevents redundancy when tackling different features or bug fixes.
This tutorial guides you through listing all branches within a remote Git repository.
Requirements:
- Git installed (refer to installation guides for Ubuntu, macOS, Windows, CentOS 7, or CentOS 8).
- A Git repository.
How to List Remote Branches in Git?
Listing branches is an essential practice in collaborative project work. Before creating a local branch, it’s wise to check if it already exists in the remote repository by listing the branches.
Git provides several methods for listing remote branches:
git branch -r: Displays all remote branches.git branch -r -v: Shows all remote branches along with their latest commit hash and commit message.git ls-remote: Lists all references in the remote repository, including branches.git remote show [remote_name]: Presents information about the specified remote, including its branches.git branch -a: Reveals all local and remote branches.
The following sections elaborate on the usage of these methods, accompanied by examples.
Method 1: List Remote Branches
The most straightforward way to list all branches in a remote repository is to use the following command:
git branch -rImportant: To ensure you get all the branches from the remote repository, run the following command first:
git fetch --allThe command downloads the metadata about all the branches on the remote, so the output is complete.

The instruction generates a rundown of all branches within the remote repository, with each branch name prefaced by the remote’s name housing those branches.
Method 2: Get Detailed Branch List
When you execute the command with the -v (–verbose) option, it provides a detailed list of remote branches, featuring the most recent commit hash and message for each branch. Here’s the command:
git branch -r -v
The output shows the remote name, branch name, latest commit hash, and the latest commit message for each branch.
Method 3: List Remote References
The command “git ls-remote” displays all references in a remote repository, such as branches. It’s handy for obtaining insights into a remote repository without the need to clone it locally.
The syntax is:
git ls-remote [remote_name_or_URL]Substitute “[remote_name_or_URL]” with the remote repository’s name if it’s already added, or with the repository’s URL if it hasn’t been added yet.
For example:

The initial column within the output displays the SHA-1 identifier of the designated Git object to which the reference is directed. In the subsequent column, you’ll find the reference’s name. The “HEAD” reference signifies the presently active branch, with a subsequent enumeration of all branches contained within the repository following it.
Method 4: Use the show Command
You can utilize the git remote command alongside the show subcommand to reveal details about a remote repository, such as its URL, branches, and tags.
The syntax is:
git remote show [remote_name]Replace [remote_name] with the name of the remote repository.
For example:
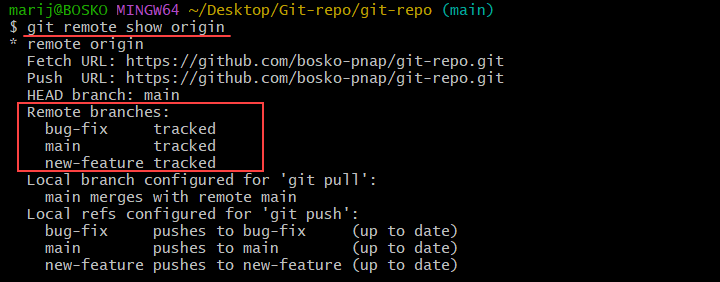
The output displays the URL of the remote, the current branch, a rundown of remote branches, and indicates the local branches set up for both git pull and git push.
Method 5: Display All Branches
To list all local and remote branches in your repository, add the -a flag when executing the git branch command. Here’s the command you should use:
git branch -a
The output first displays the local branches, highlights the currently active one, and then enumerates all branches in the remote repository. Enumerating all branches facilitates comparing the project’s status between the remote and local repositories. This approach aids in synchronizing any changes that may exist.
Conclusion
This tutorial demonstrates listing all Git branches in a remote repository. Explore further about Git in our beginner’s guide, or delve into Git tags to understand how to utilize these reference points for version release marking.

